This post walks you through a clear, step-by-step care process so you know what to expect. You’ll learn the common steps for tooth implant, why each step matters, and what patients typically experience from the first visit through the final restoration. Read on to get a practical view of the timeline, recovery, and questions to ask at your consultation.
What a tooth implant is and why steps matter
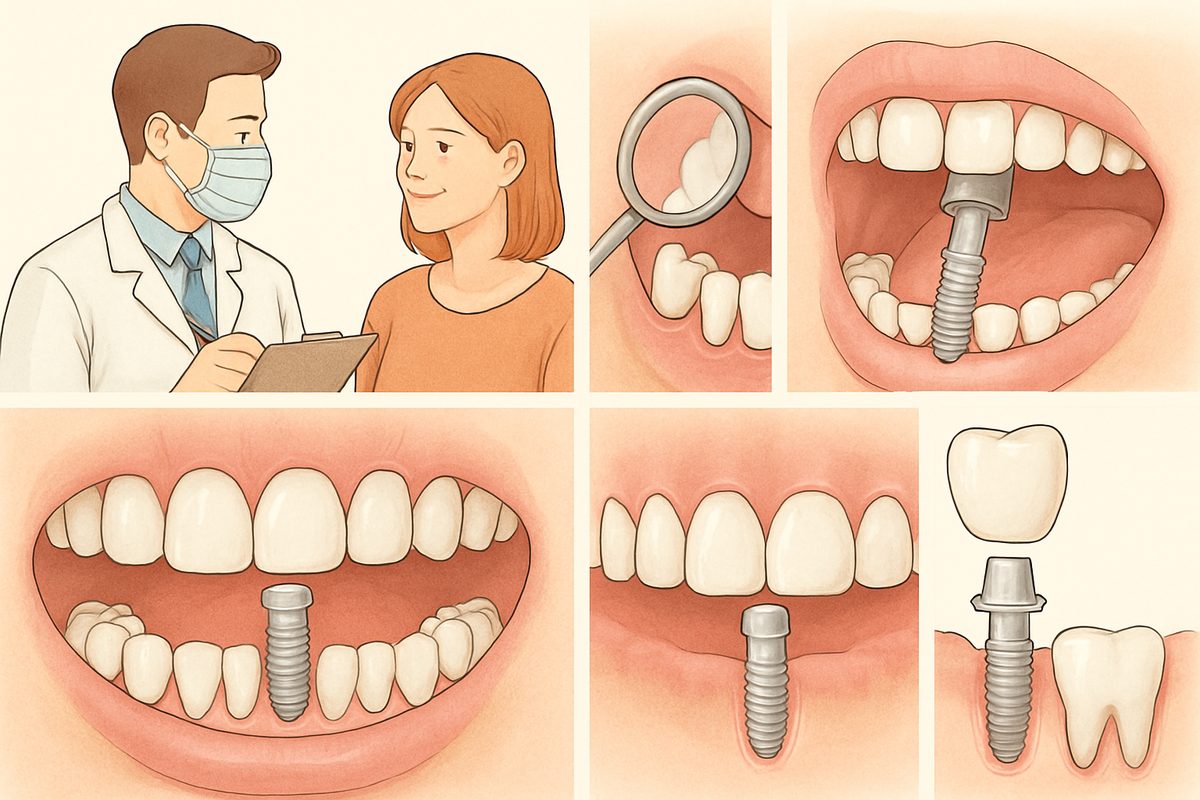
A tooth implant is a titanium post placed into the jaw to replace a missing tooth root and support a crown or bridge. Following the proper steps for tooth implant improves success, reduces complications, and leads to a more natural, lasting result. Each stage supports healing and ensures the final restoration fits and works correctly.
Step 1: Initial consultation and planning
Medical and dental history review
The doctor reviews your health, medications, and oral exam to identify risks, such as diabetes or smoking, that can affect healing. Be honest about your medical history and habits so the team can plan safely and reduce the risk of complications.
3D imaging and personalized treatment plan
CBCT 3D scans and digital planning show bone quality and nerve locations. Using these scans, the team creates a customized plan that covers timing, implant size, and costs. This step sets expectations and determines whether additional procedures are needed.
Step 2: Preparing the mouth
Treating infections and extractions
Any infection or unstable tooth must be treated first. Removing diseased tissue and controlling gum disease reduces the risk of implant failure. Extractions may be done with immediate or delayed planning depending on the case.
Bone grafting or sinus lifts, when needed
If the bone is too thin or low, grafts or sinus lifts build volume so the implant has solid support. These add time to the plan but improve long-term stability. Healing after grafting is usually several months before placement.
Step 3: Implant placement surgery
Surgical options and what to expect
Implant surgery is commonly done with local anesthesia and optional sedation. The procedure time varies, and most people have mild swelling and discomfort for a few days. Follow-up visits check healing and address any concerns.
Guided surgery and precision techniques
Guided or robotic-assisted placement improves accuracy and safety. These tools help place the implant exactly where planned, protecting nearby nerves and sinuses and improving the final fit.
Step 4: Healing and osseointegration
Healing takes several months as the bone fuses to the implant (osseointegration). You’ll have routine checkups to confirm integration. Good oral hygiene, a soft diet, and avoiding smoking speed healing and support success.
Step 5: Abutment and final restoration
After integration, an abutment connects the implant to the crown or bridge. Impressions or digital scans are taken for a custom restoration. The lab fabricates the crown, the dentist checks fit and bite, and then the final restoration is placed.
Common risks, maintenance, and long-term care
Risks include infection, implant mobility, or bone loss. Call your office for severe pain, swelling, or fever. Long-term care means daily cleaning, regular dental checkups, and avoiding hard habits like chewing ice to protect your implant.
Questions to ask before you start the process
Ask about the team’s experience, expected timeline, imaging and guided surgery options, success rates, and total costs, including any grafting or provisional restorations. Confirm sedation choices and follow-up protocols.
About Gwinnett Dental Implant Center and how we help
Gwinnett Dental Implant Center in Lilburn, GA, offers board-certified periodontists, Yomi robotic-guided surgery, CBCT imaging, and an on-site master lab for custom restorations. Our bilingual team and flexible financing help patients move through the steps for tooth implant in Lilburn, GA, with clear communication and comfort. Schedule a consultation to review your personalized plan and next steps.